


title: "使用 Linux deploy 搭建属于自己的Nginx+PHP-Web服务器,FRP内网穿透,可获取用户真实IP"
date: 2020-04-22
tags: ["arm","linux","nginx","php","centos"]
categories: ["arm","linux","nginx","php","centos"]
前言
第一次写文章,有问题请见谅,文章有错误请指出,本文末尾会贴出所有用到的文章,感谢各位大佬。
所需软件: Busybox,Linux deploy 本文所用均为最新版 (都需要ROOT完整权限,没有root建议别浪费时间了)
测试环境: Mi6 — MIUI 11 开发版,Android 9.0,MagiskSU,6GB物理内存,64GB存储空间,32GB分配空间
Linux deploy 下载地址: https://github.com/meefik/linuxdeploy/releases
Busybox 去某安搜索就行了 第一个就是
====================本文以CentOS7作为演示====================
1.软件安装与配置
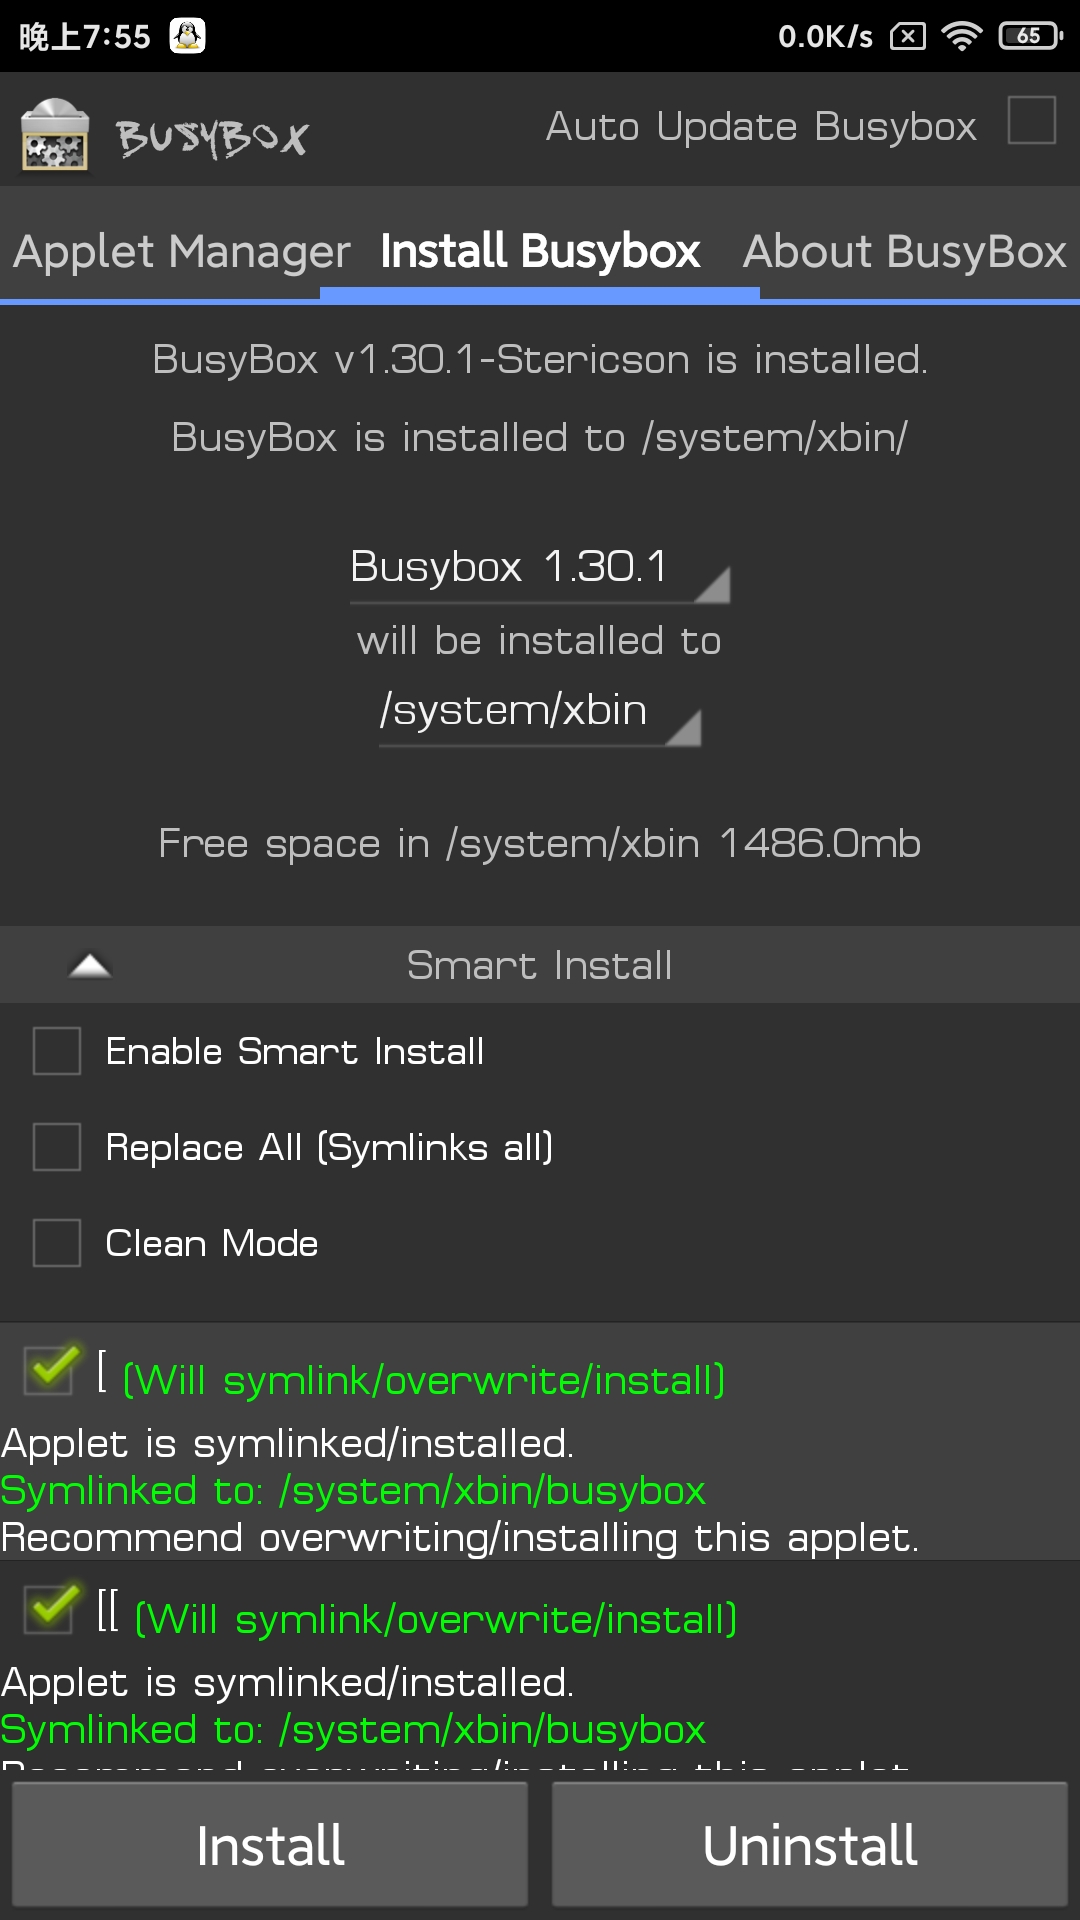
首先打开busybox 安装位置选择 /system/xbin 点击 install 安装 (当然别的位置也行 与Linux deploy的位置一致就行)
然后就是Linux deploy了 打开软件 选择左上角三道杠 点击配置文件 写一个你喜欢的名字就行

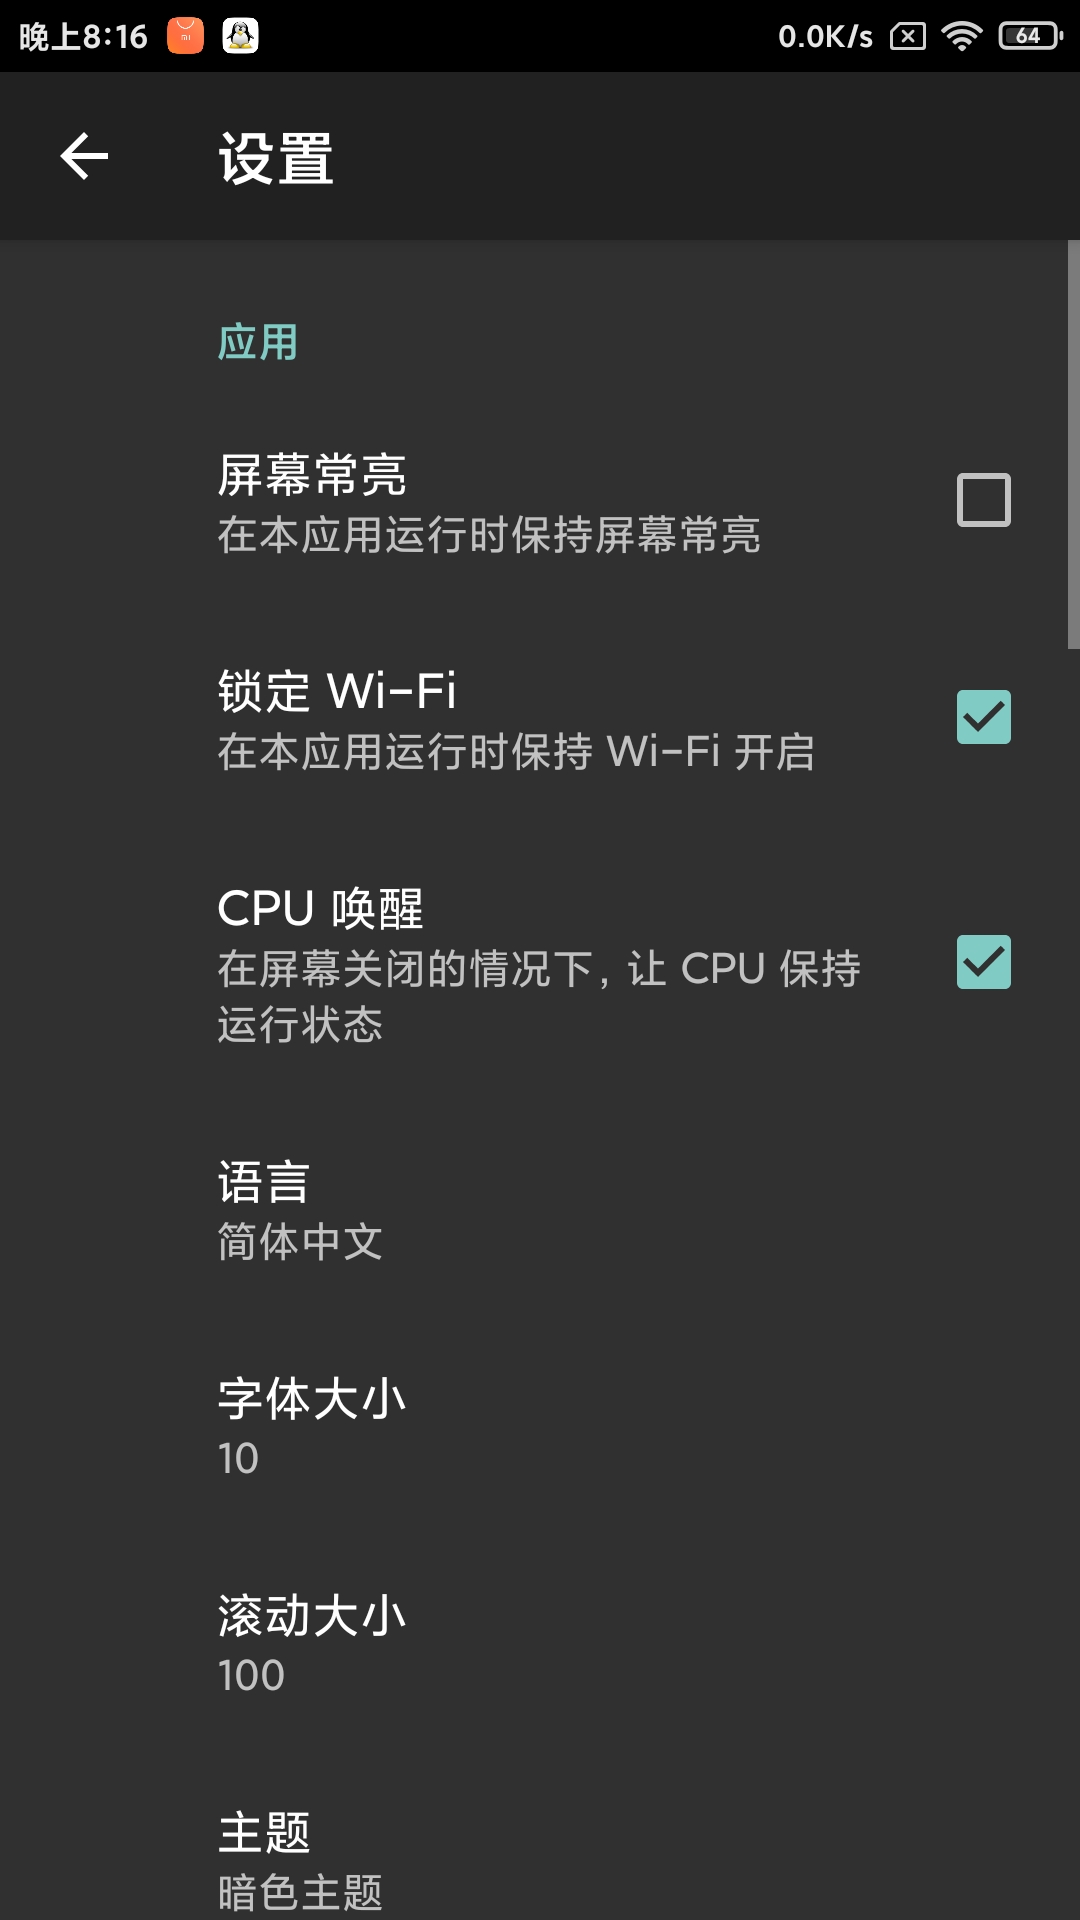
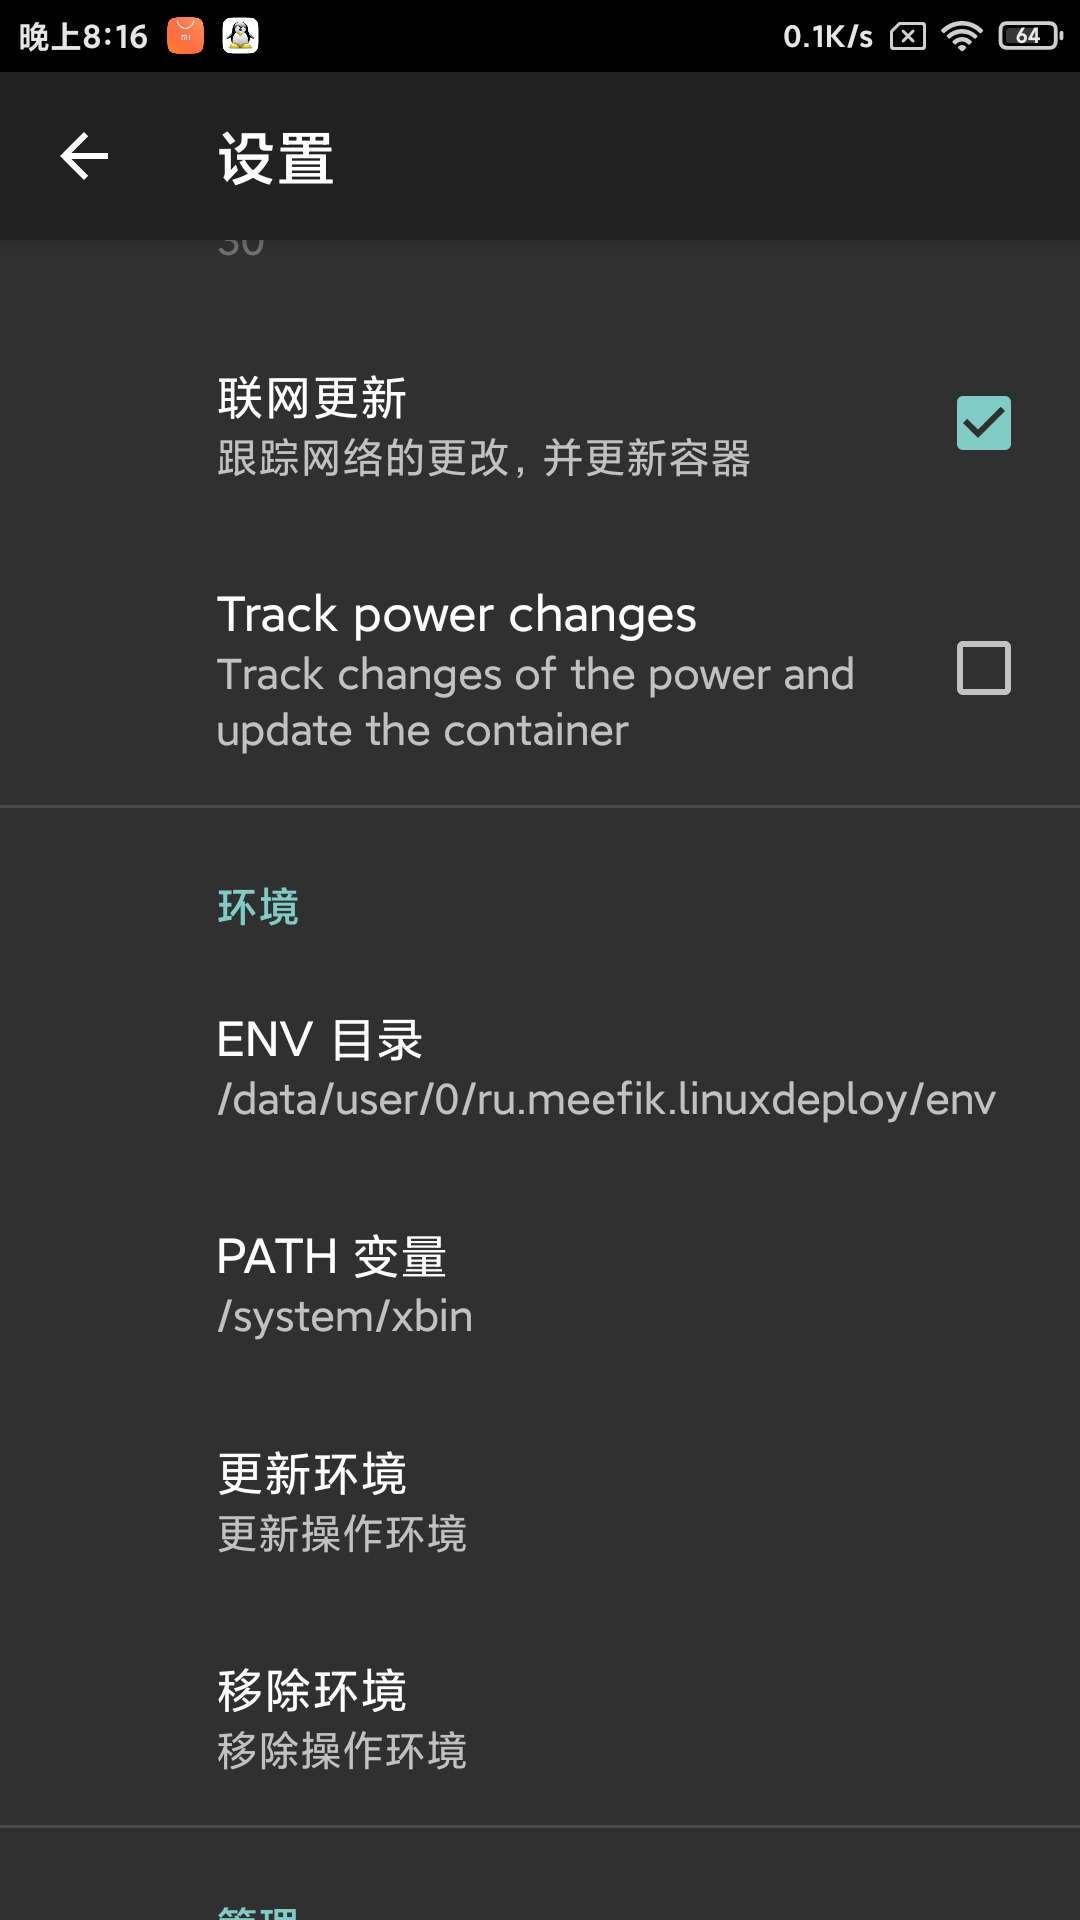
然后点击设置 勾选 锁定wifi,cpu唤醒 ,联网更新,ENV目录不用管它,path变量设置为busybox的安装目录,然后点击一次更新操作环境,最下面有个调试模式最好也勾选上,方便看信息
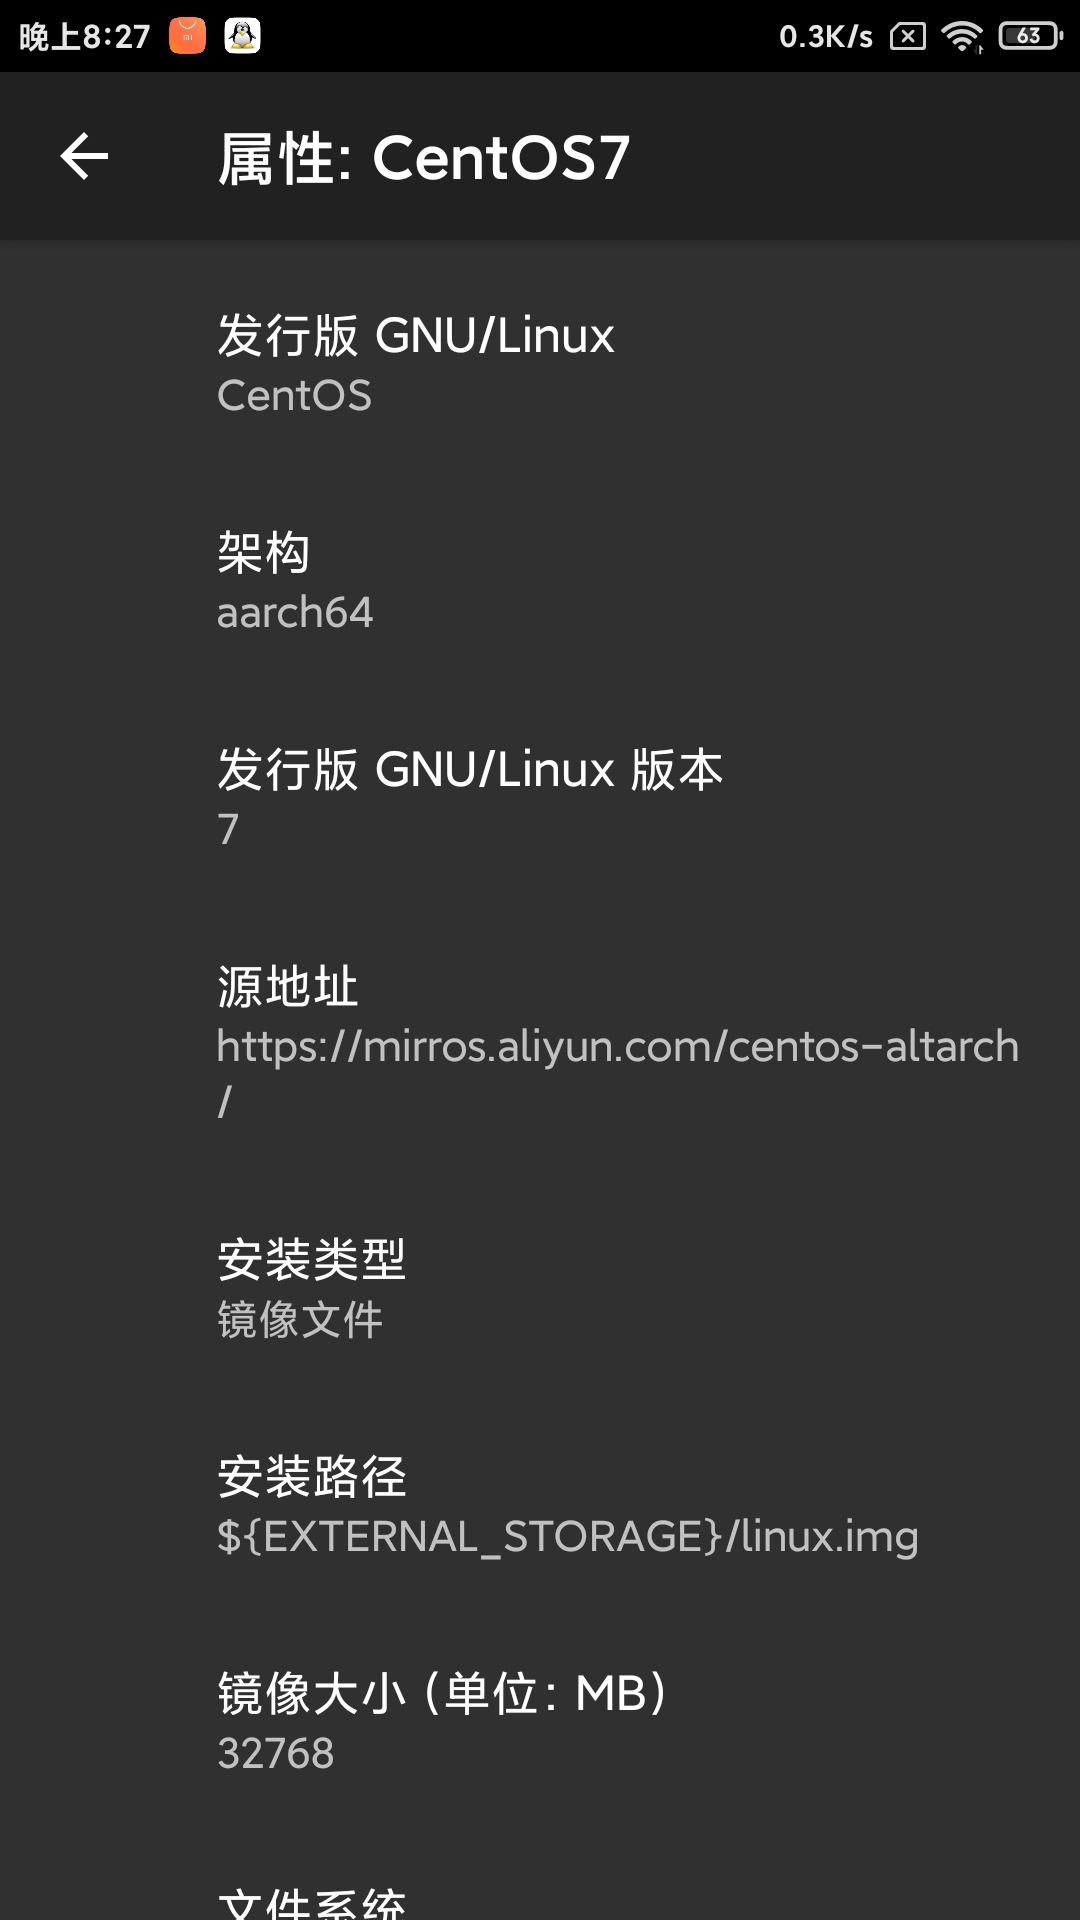
然后我们回到主界面选择右下角三道杠 如图设置即可
源地址设置为阿里云:https://mirrors.aliyun.com/centos-altarch/
镜像大小根据所需设置 我这里是32GB
至于安装类型,,,基本用不到,(其他安装类型一个也没成功...)
用户名密码自己设置就行了 (ps:截图的源地址打错了)
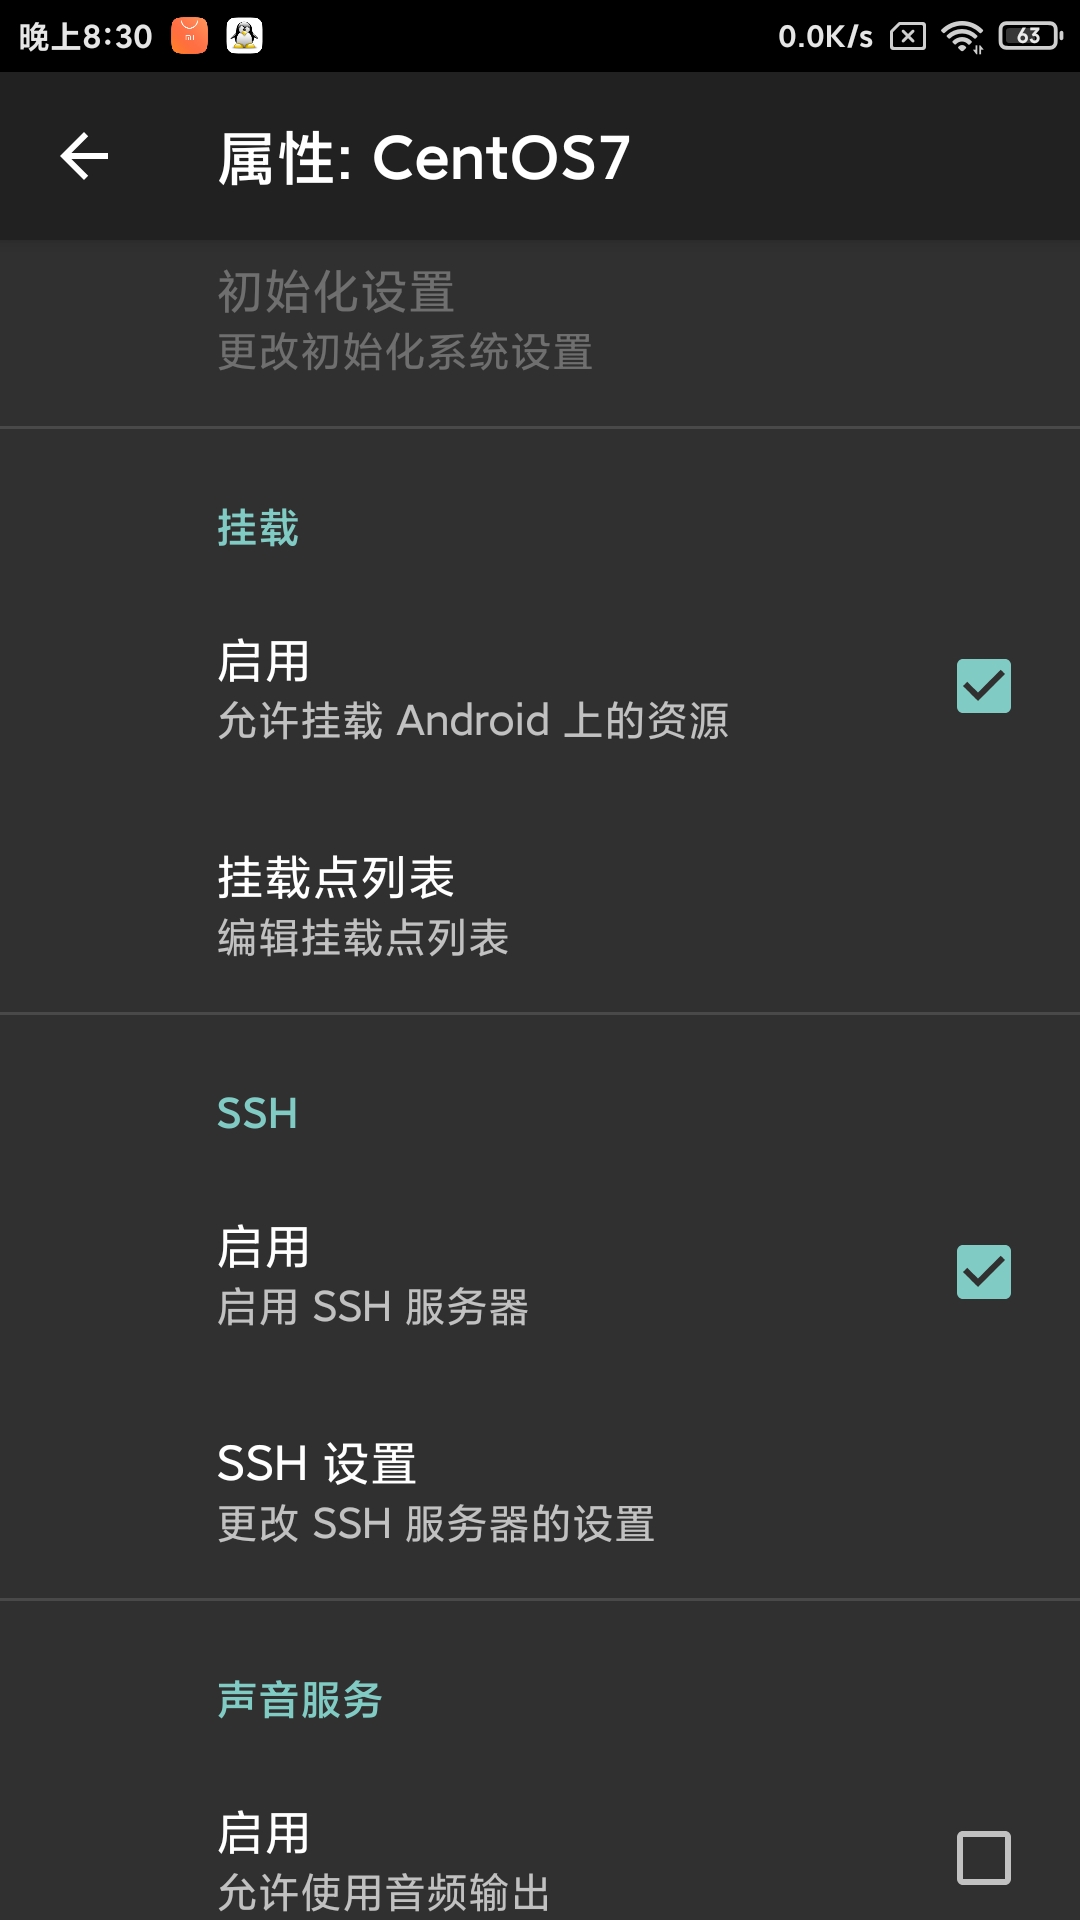
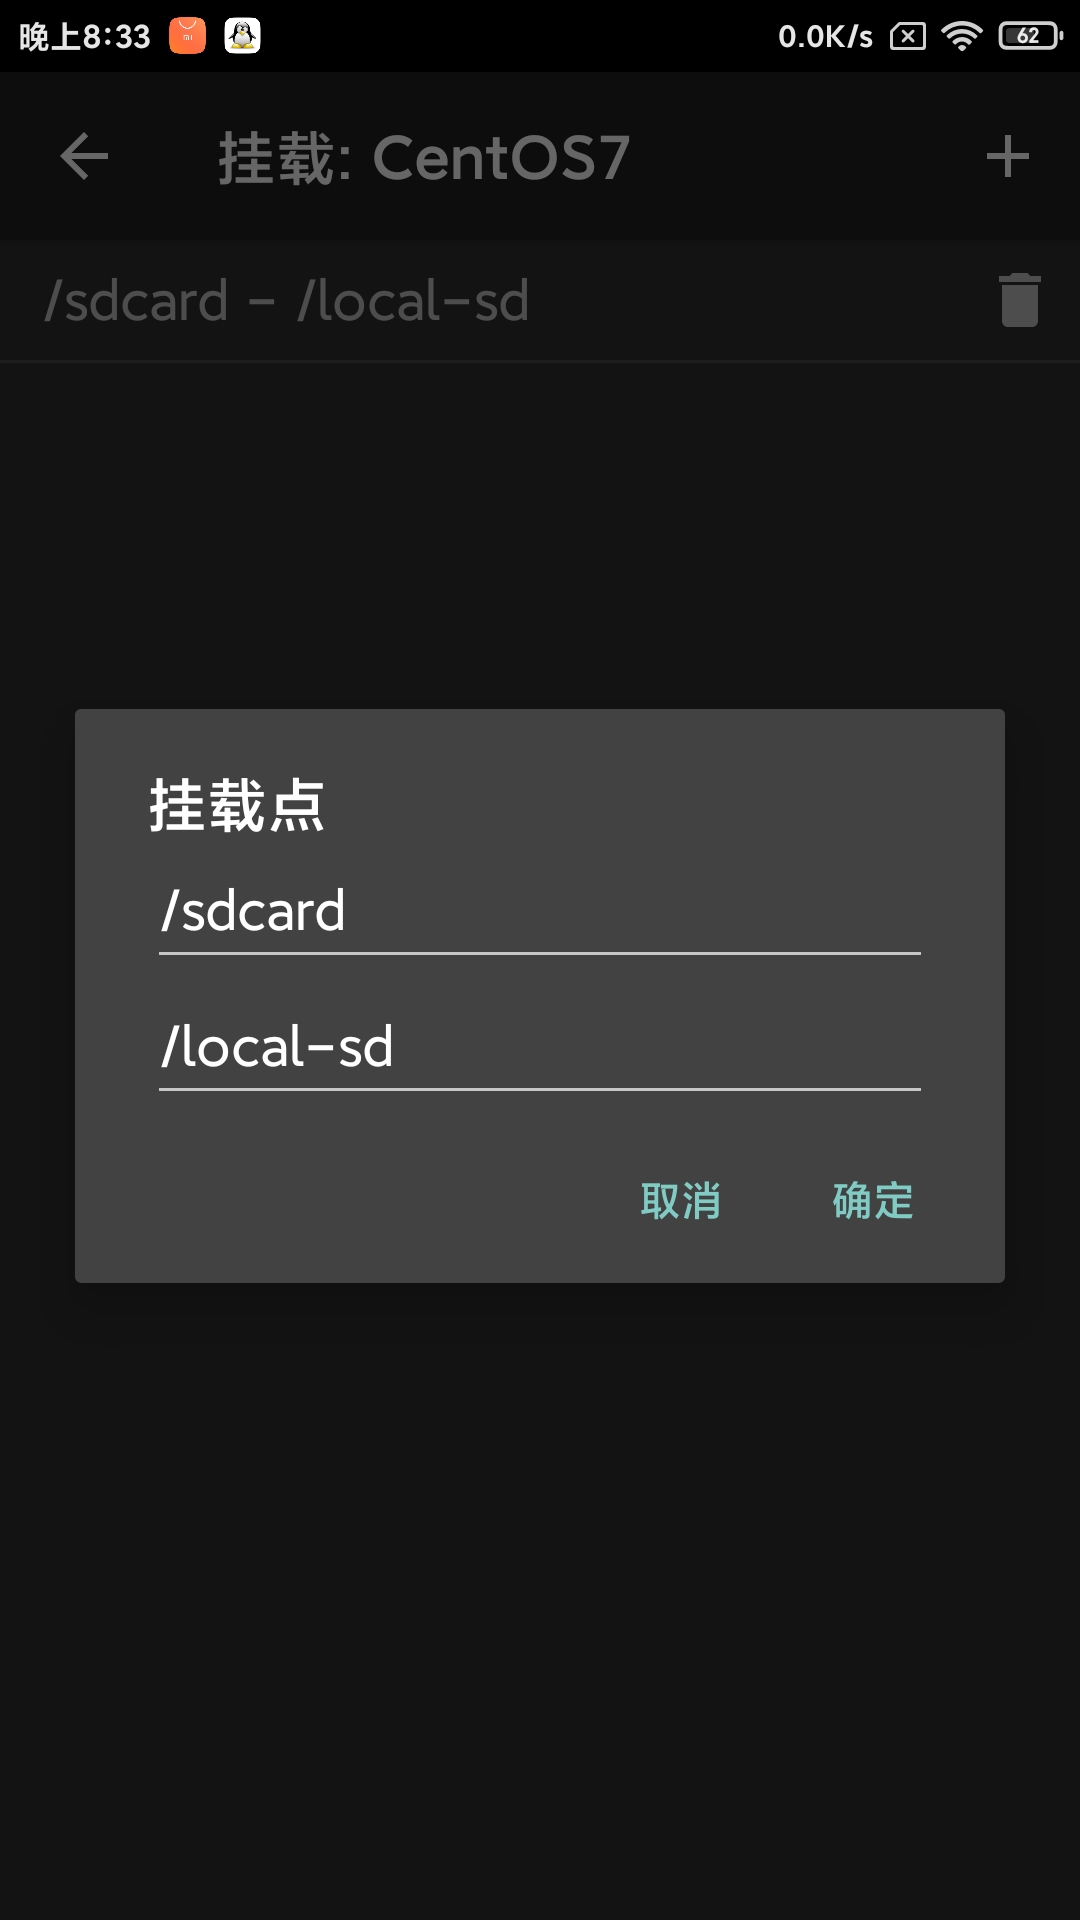
勾选启用挂载和启用ssh 添加一个挂载点方便访问sd卡
至此基本配置就完成了
2.基本系统安装与调试
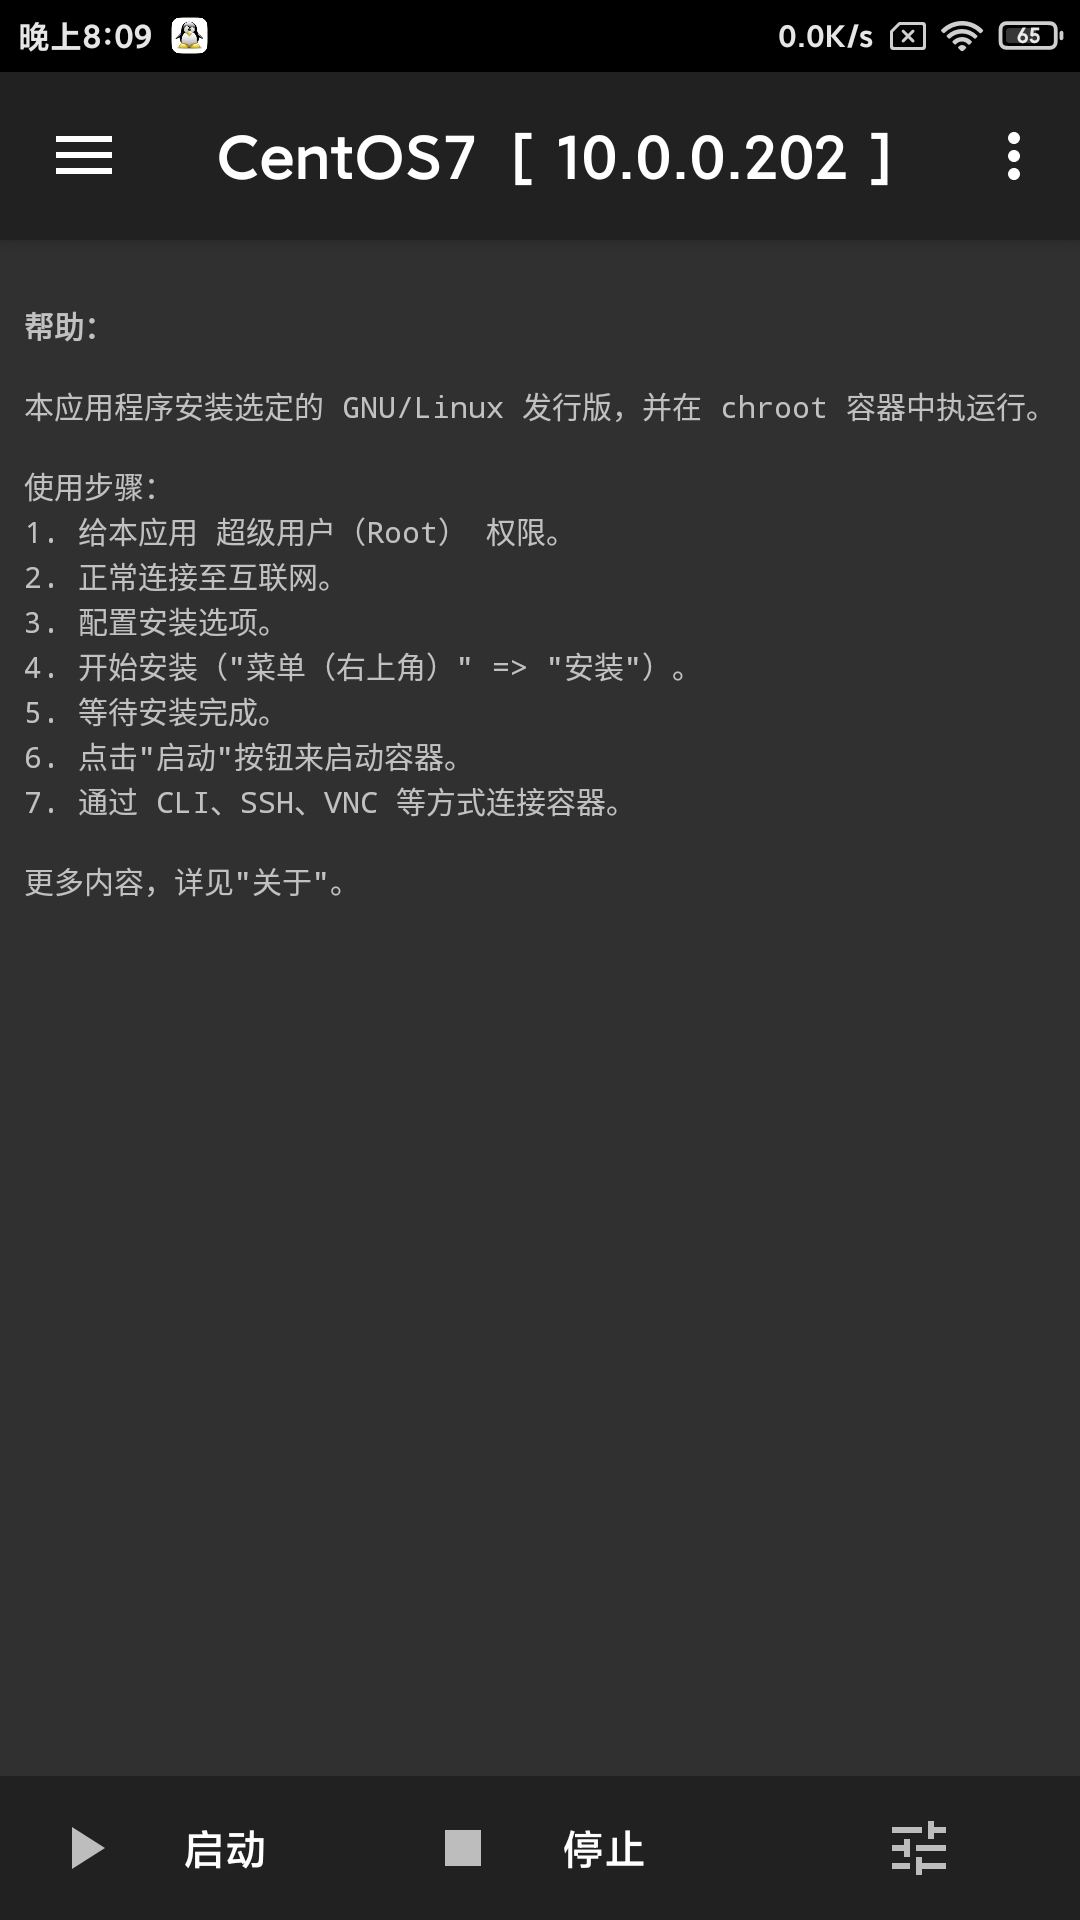
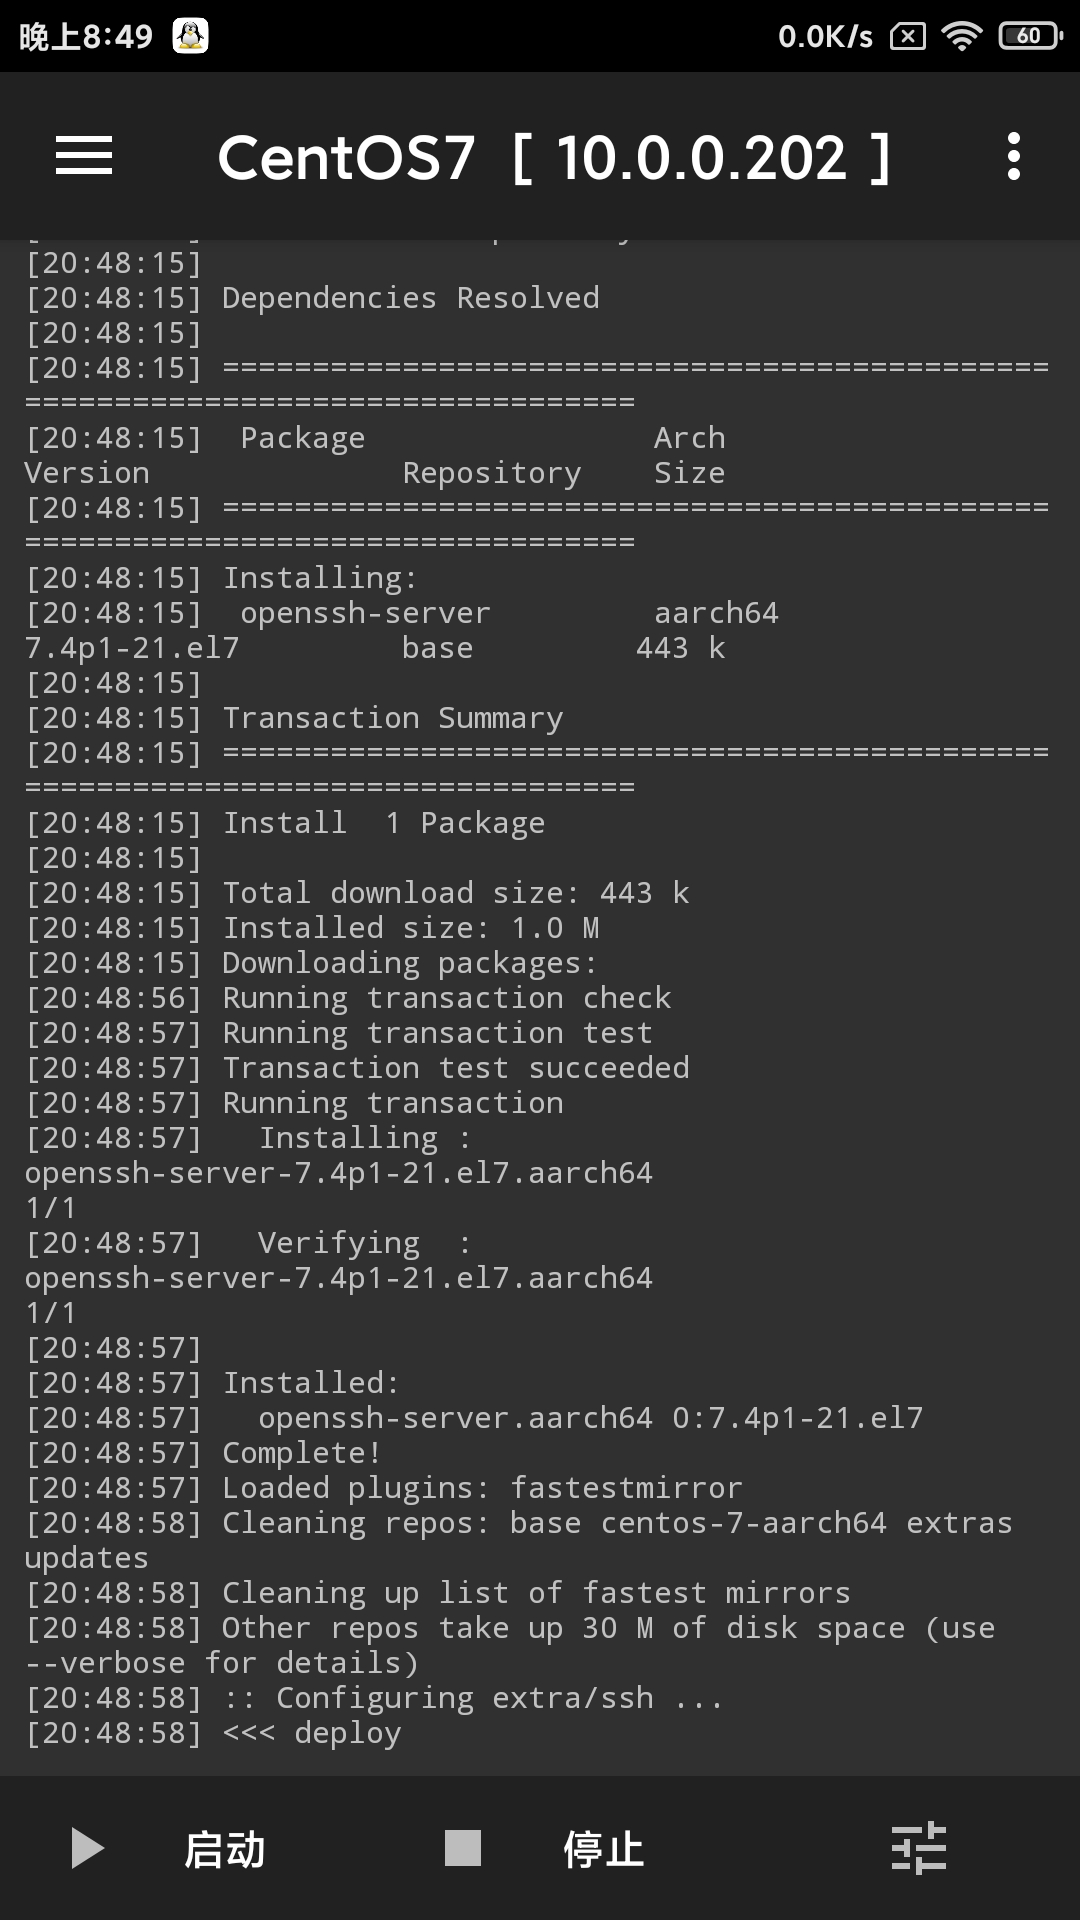
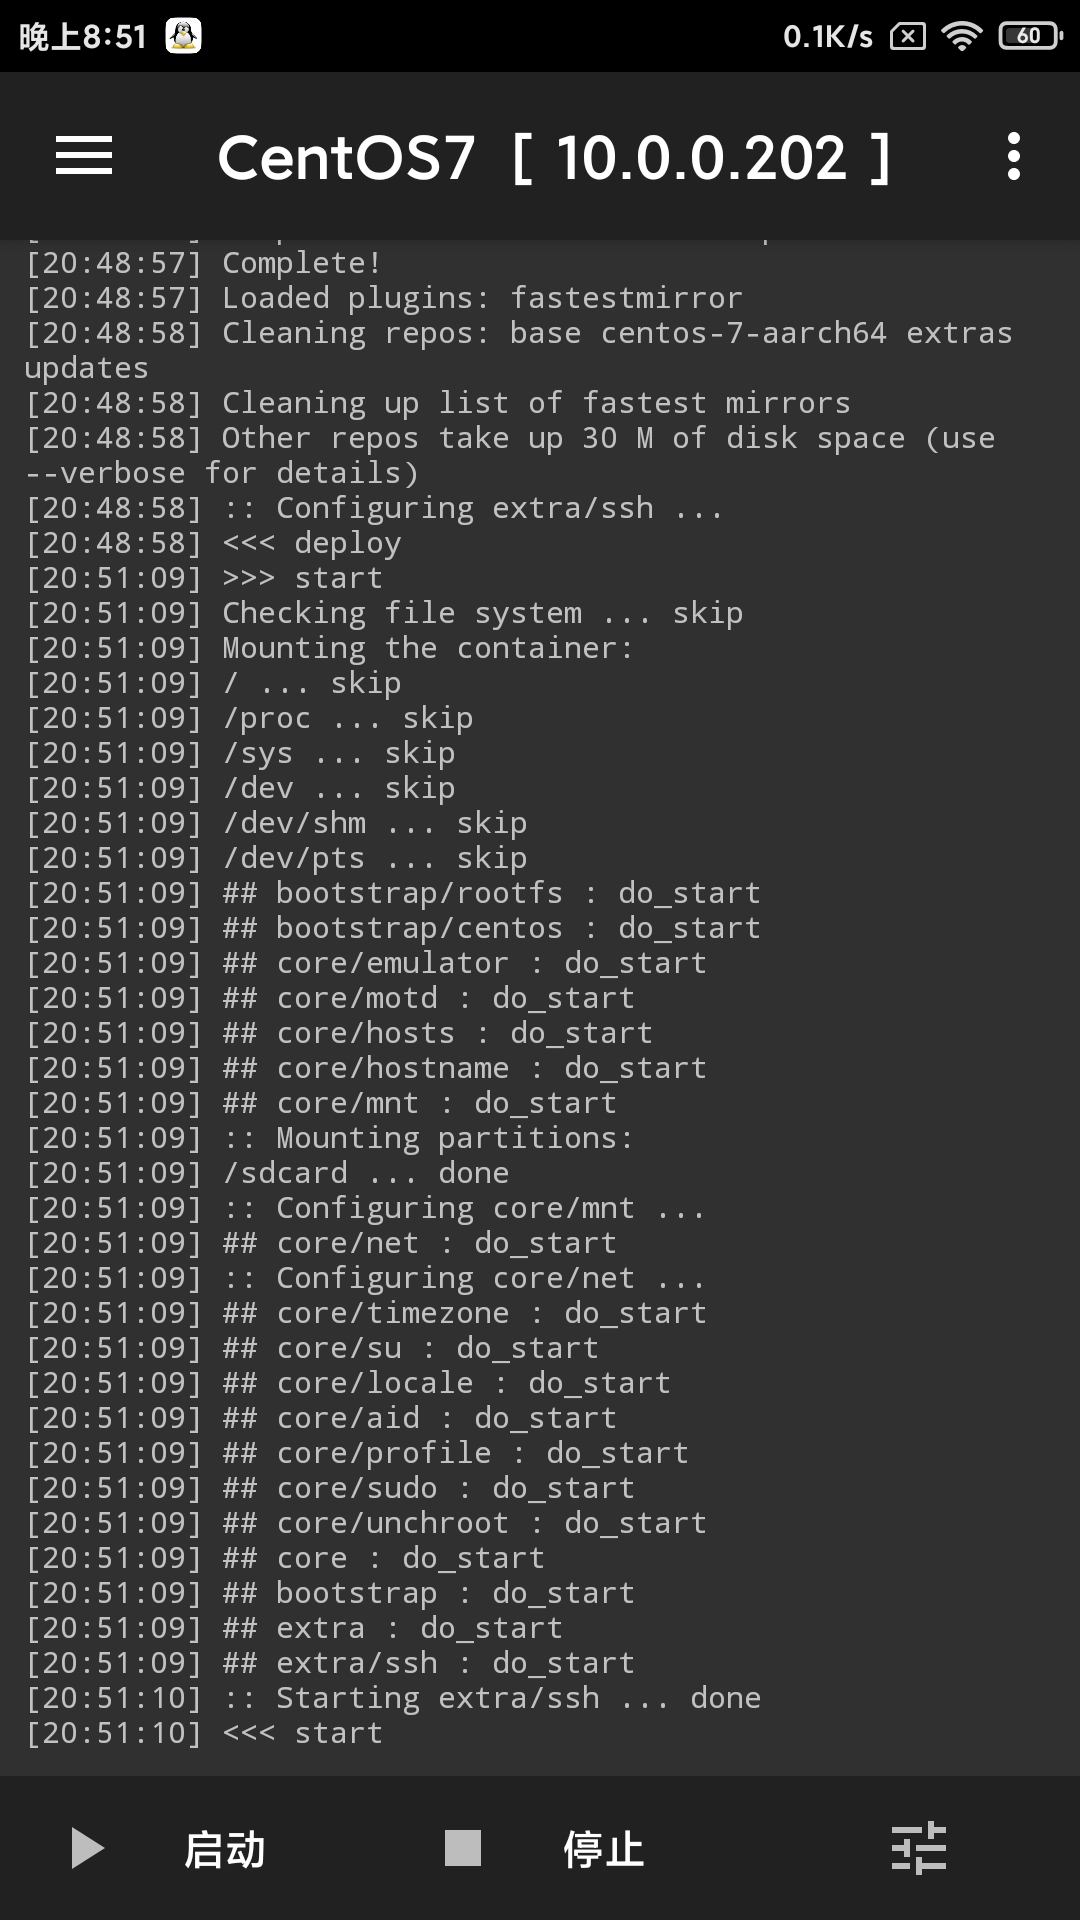
回到主界面 选择右上角三个点 点击安装 然后等待安装完毕即可 理论应该不会出现什么问题
安装完毕回显 <<<deploy 就可以了
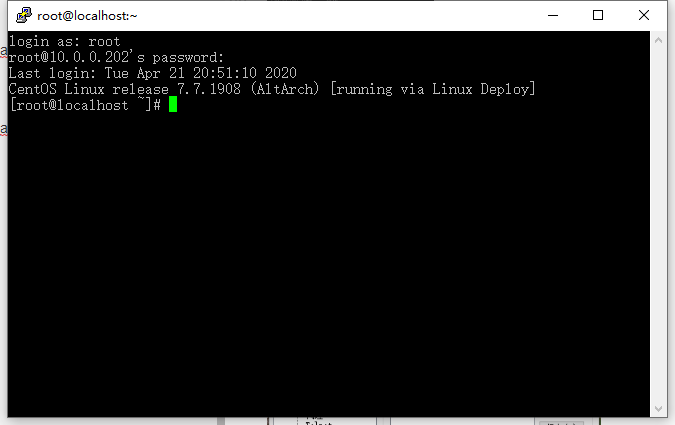
然后我们点击启动 再用ssh工具连接 就和普通的没什么两样了 qwq
设备内网IP:22
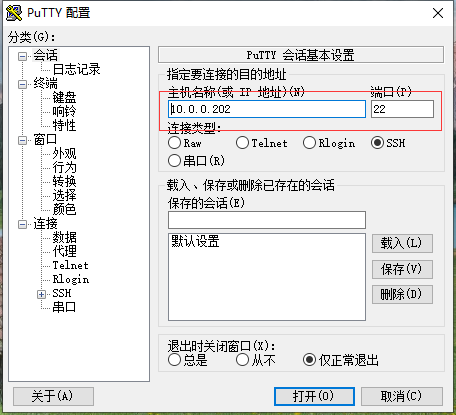
用户名密码为软件中设置的密码
更换YUM软件源
cd /etc/yum.repos.d/
mkdir old
mv * old
vi CentOS-Base.repo  #添加如下代码
# CentOS-Base.repo
#
# The mirror system uses the connecting IP address of the client and the
# update status of each mirror to pick mirrors that are updated to and
# geographically close to the client.  You should use this for CentOS updates
# unless you are manually picking other mirrors.
#
# If the mirrorlist= does not work for you, as a fall back you can try the
# remarked out baseurl= line instead.
#
#

[base]
name=CentOS-$releasever - Base
baseurl=https://mirrors.aliyun.com/centos-altarch/$releasever/os/$basearch/
gpgcheck=1
gpgkey=https://mirrors.aliyun.com/centos/RPM-GPG-KEY-CentOS-7

#released updates
[updates]
name=CentOS-$releasever - Updates
baseurl=https://mirrors.aliyun.com/centos-altarch/$releasever/updates/$basearch/
gpgcheck=1
gpgkey=https://mirrors.aliyun.com/centos/RPM-GPG-KEY-CentOS-7

#additional packages that may be useful
[extras]
name=CentOS-$releasever - Extras
baseurl=https://mirrors.aliyun.com/centos-altarch/$releasever/extras/$basearch/
gpgcheck=1
gpgkey=https://mirrors.aliyun.com/centos/RPM-GPG-KEY-CentOS-7
enabled=1

#additional packages that extend functionality of existing packages
[centosplus]
name=CentOS-$releasever - Plus
baseurl=https://mirrors.aliyun.com/centos-altarch/$releasever/centosplus/$basearch/
gpgcheck=1
enabled=0
gpgkey=https://mirrors.aliyun.com/centos/RPM-GPG-KEY-CentOS-7
vi epel.repo #添加如下代码
[epel]
name=Extra Packages for Enterprise Linux 7 - $basearch
baseurl=https://mirrors.tuna.tsinghua.edu.cn/epel/7/$basearch
failovermethod=priority
enabled=1
gpgcheck=1
gpgkey=file:///etc/pki/rpm-gpg/RPM-GPG-KEY-EPEL-7

[epel-debuginfo]
name=Extra Packages for Enterprise Linux 7 - $basearch - Debug
baseurl=https://mirrors.tuna.tsinghua.edu.cn/epel/7/$basearch/debug
failovermethod=priority
enabled=0
gpgkey=file:///etc/pki/rpm-gpg/RPM-GPG-KEY-EPEL-7
gpgcheck=1

[epel-source]
name=Extra Packages for Enterprise Linux 7 - $basearch - Source
baseurl=https://mirrors.tuna.tsinghua.edu.cn/epel/7/SRPMS
failovermethod=priority
enabled=0
gpgkey=file:///etc/pki/rpm-gpg/RPM-GPG-KEY-EPEL-7
gpgcheck=1
cd /etc/pki/rpm-gpg/
mkdir old
mv * old
wget https://mirrors.aliyun.com/centos-altarch/7/os/aarch64/RPM-GPG-KEY-CentOS-7
wget https://mirrors.aliyun.com/centos-altarch/7/os/aarch64/RPM-GPG-KEY-CentOS-7-aarch64
wget https://archive.fedoraproject.org/pub/epel/RPM-GPG-KEY-EPEL-7 #网络不好可能下载不来
rpm --import /etc/pki/rpm-gpg/RPM-GPG-KEY-CentOS-7-aarch64
rpm --import /etc/pki/rpm-gpg/RPM-GPG-KEY-CentOS-7
rpm --import /etc/pki/rpm-gpg/RPM-GPG-KEY-EPEL-7
yum makecache		#生成缓存

3.终端配色与基本美化
终端配色
vi /etc/bashrc
#添加如下代码
export PS1="\[\e[37;1m\][\[\e[35;1m\]\u\[\e[32;1m\]@\[\e[34;1m\]\h \[\e[31;1m\]\w \[\e[33;1m\]\t\[\e[37;1m\]]\[\e[32;1m\]\$\[\e[m\]"
source /etc/bashrc
vi编辑器设置
yum -y install vim-enhanced
alias vi=vim
vi ~/.vimrc
#添加如下代码
syntax on
filetype indent on
set showcmd
set showmatch
set incsearch
set syn=cpp
set nu!
set hlsearch
set nobackup
set ruler
colorscheme evening
set autoindent
set smartindent
set tabstop=4
set shiftwidth=4
set enc=utf-8
set fenc=utf-8
set fencs=utf-8,ucs-bom,gb18030,gbk,gb2312,cp936
set langmenu=zh_CN.UTF-8
set helplang=cn
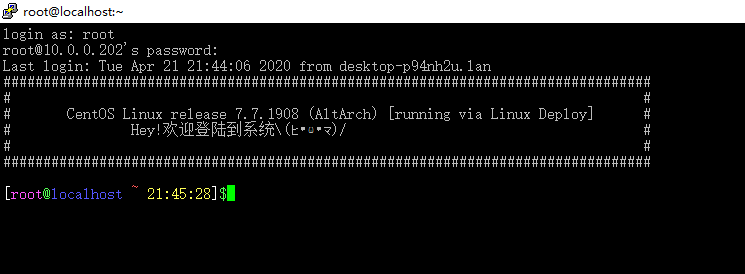
SSH登陆信息修改
vi /etc/motd #随你怎么设置都行
操作完一波后就会像这样啦
4.编译安装所需依赖包
请按本文顺序安装
确保安装以下基本软件
yum -y install wget net-tools gcc clang curl make gcc-c++ unzip
注意 本文以下所有安装的软件源码目录均为
cd /usr/src
编译安装Perl
cd /usr/src
wget https://www.cpan.org/src/5.0/perl-5.30.2.tar.gz
tar -zvxf perl-5.30.2.tar.gz
cd perl-5.30.2
./Configure -des -Dprefix=/usr/local/perl
make
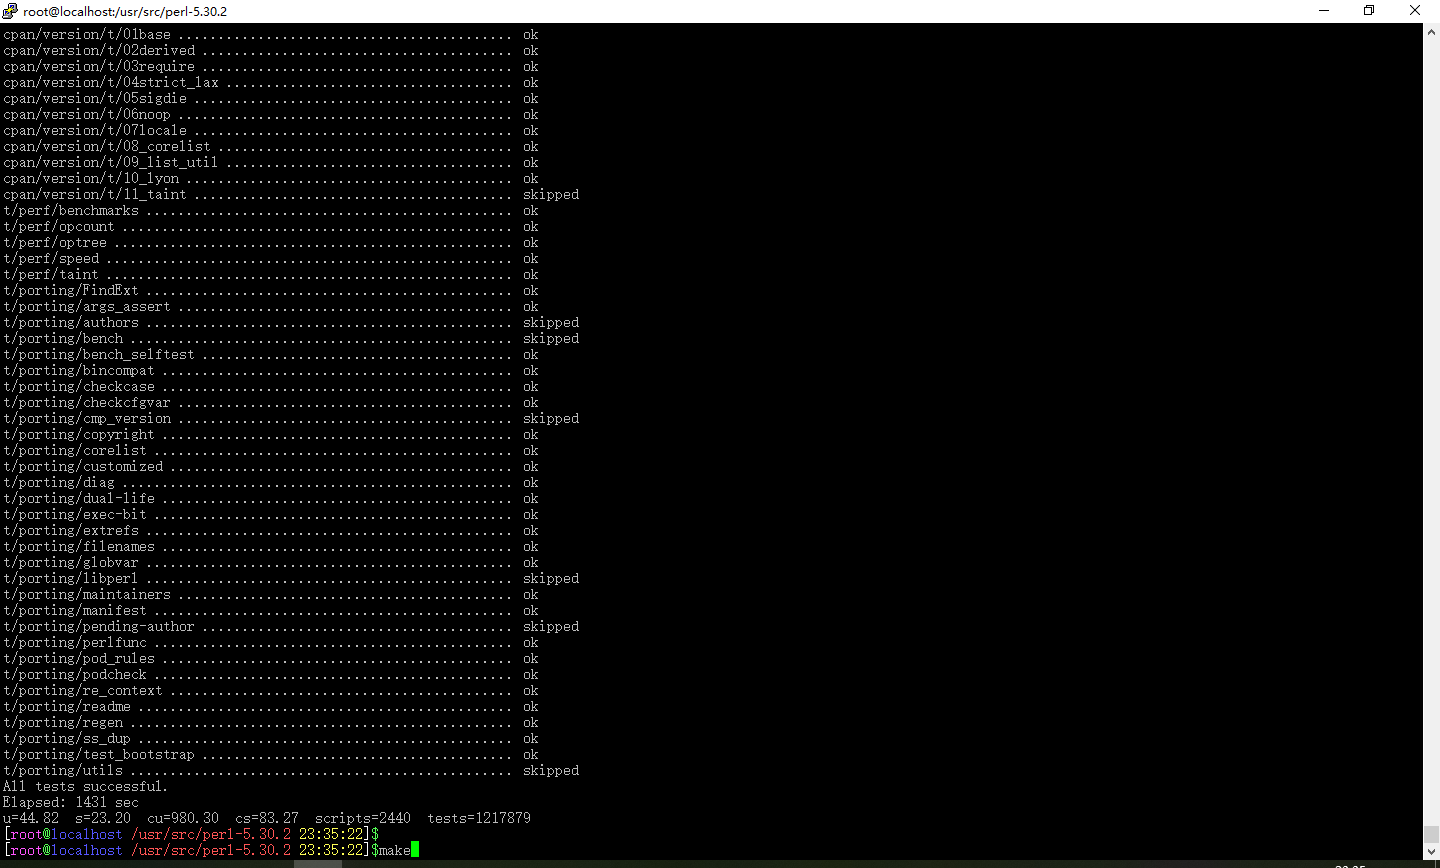
make test #可以先测试一下
make install
mv /usr/bin/perl /usr/bin/perl.bak
ln -s /usr/local/perl/bin/perl /usr/bin/perl
perl -v
emmmm 121w这个数字是真的恐怖....
编译安装Pcre
cd /usr/src
wget https://nchc.dl.sourceforge.net/project/pcre/pcre/8.44/pcre-8.44.tar.gz
tar -zvxf pcre-8.44.tar.gz
cd pcre-8.44
./configure --enable-utf8
make
make check
make install
编译安装zlib
cd /usr/src
wget http://www.zlib.net/zlib-1.2.11.tar.gz
tar -zvxf zlib-1.2.11.tar.gz
cd zlib-1.2.11
./configure
make
make install
编译安装OpenSSL
cd /usr/src
wget https://www.openssl.org/source/openssl-1.1.1g.tar.gz
tar -zvxf openssl-1.1.1g.tar.gz
cd openssl-1.1.1g
./config shared --openssldir=/usr/local/openssl --prefix=/usr/local/openssl
make
make install
vi /etc/ld.so.conf
#添加如下代码
/usr/local/openssl/lib
ldconfig -v
ln -s /usr/local/openssl/bin/openssl  /usr/local/bin/openssl
ln -s /usr/local/openssl/bin/openssl  /usr/bin/openssl
openssl version -a
5.编译安装Pure-ftpd
vsftpd因为Android限制用不来 大佬可以试试
cd /usr/src
wget https://download.pureftpd.org/pub/pure-ftpd/releases/pure-ftpd-1.0.49.tar.gz
tar -zvxf pure-ftpd-1.0.49.tar.gz
cd pure-ftpd-1.0.49
./configure --prefix=/usr/local/pureftpd --without-inetd --with-altlog --with-puredb --with-throttling --with-peruserlimits --with-tls --with-everything
./configure --prefix=/usr/local/pureftpd --with-everything #这里是否需要执行两次,我也不知道qwq
make
make install #说明一下,我这边测试配置文件是不需要任何改动的
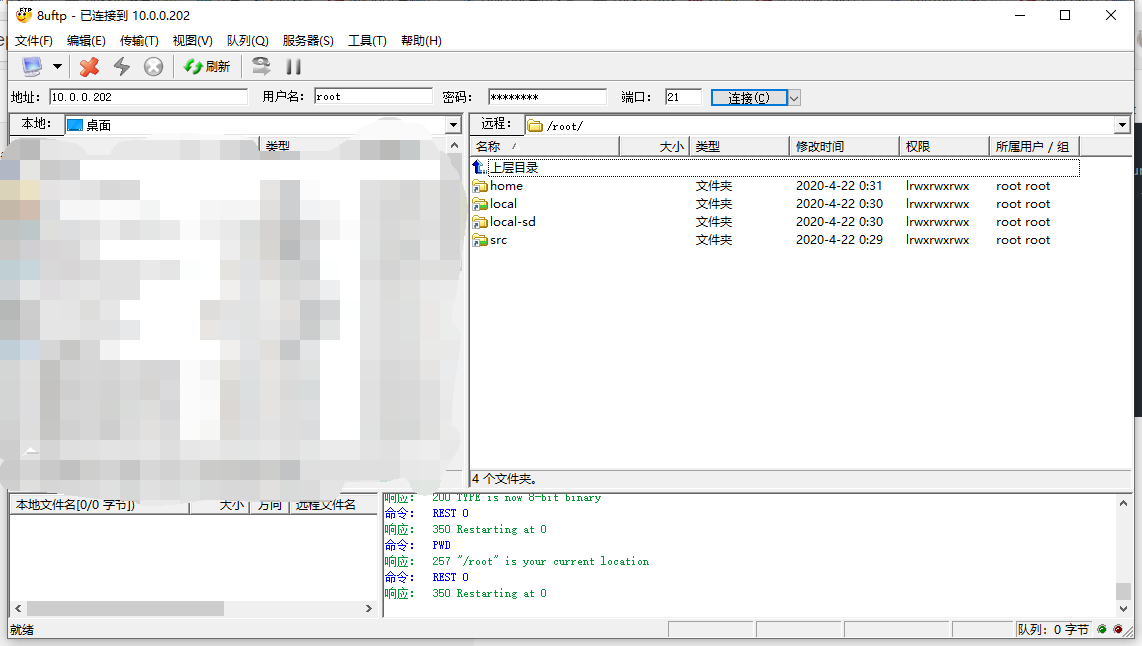
ln -s /usr/local/pureftpd/sbin/pure-ftpd /usr/bin/pure-ftpd
pure-ftpd &
netstat -antup | grep 21 #检查21端口
ln -s /usr/src/ /root/src
ln -s /home/ /root/home
ln -s /local-sd/ /root/local-sd
ln -s /usr/local/ /root/local #创建四个软连接方便访问
连接测试正常 读写正常
6.编译安装Nginx
cd /usr/src
wget http://www.nginx.org/download/nginx-1.17.10.tar.gz
tar -zvxf nginx-1.17.10.tar.gz
cd nginx-1.17.10
./configure --prefix=/usr/local/nginx --with-http_auth_request_module --with-http_ssl_module --with-http_v2_module --with-http_gunzip_module --with-pcre --with-pcre-jit --with-threads --with-ipv6 --with-http_realip_module --with-openssl=/usr/src/openssl-1.1.1g #这里需要指定一下OpenSSL的解压位置
make
make install
ln -s /usr/local/nginx/sbin/nginx /usr/bin/nginx
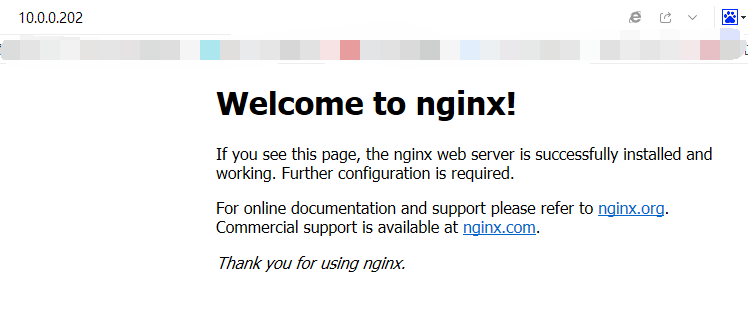
nginx &
netstat -antup | grep 80
浏览器打开看见如下界面 证明Nginx已经成功启动了
7.编译安装PHP7
#再安装一遍依赖
yum install -y gcc gcc-c++ make zlib zlib-devel pcre pcre-devel libjpeg libjpeg-devel libpng libpng-devel freetype freetype-devel libxml2 libxml2-devel glibc glibc-devel glib2 glib2-devel bzip2 bzip2-devel ncurses ncurses-devel curl curl-devel e2fsprogs e2fsprogs-devel krb5 krb5-devel openssl openssl-devel openldap openldap-devel nss_ldap openldap-clients openldap-servers
#不用担心重复安装YUM会自动判断
cd /usr/src
wget http://cn2.php.net/distributions/php-7.3.2.tar.gz
tar -zvxf php-7.3.2.tar.gz
cd php-7.3.2
./configure --prefix=/usr/local/php7 --exec-prefix=/usr/local/php7 --bindir=/usr/local/php7/bin --sbindir=/usr/local/php7/sbin --includedir=/usr/local/php7/include --libdir=/usr/local/php7/lib/php --mandir=/usr/local/php7/php/man --with-config-file-path=/usr/local/php7/etc --enable-fpm --with-mysqli --with-openssl --with-pdo-mysql --enable-mbstring --with-gd --with-tokenizer
make
make install
cp php.ini-production /usr/local/php7/etc/php.ini
cp /usr/local/php7/etc/php-fpm.conf.default /usr/local/php7/etc/php-fpm.conf
cp /usr/local/php7/etc/php-fpm.d/www.conf.default /usr/local/php7/etc/php-fpm.d/www.conf
echo "export PATH=$PATH:/usr/local/php7/bin/:/usr/local/php7/sbin/">>/etc/profile.d/php.sh
source /etc/profile.d/php.sh
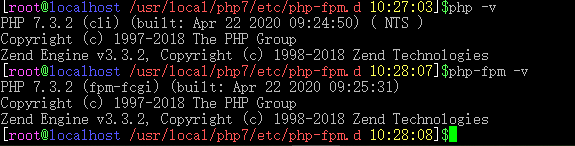
php -v
php-fpm -v
8.关联Nginx与PHP
新建一个你喜欢的目录 设置权限 并创建软连接
mkdir /usr/share/wwwroot
chown nobody:nobody /usr/share/wwwroot
chmod 777 /usr/share/wwwroot
ln -s /usr/share/wwwroot /root/wwwroot
结束一些不必要的进程
pkill php-fpm
pkill php
pkill nginx
配置Nginx
vi /usr/local/nginx/conf/nginx.conf
代码如下
user  root;

worker_processes 4;
#error_log  logs/error.log;
#error_log  logs/error.log  notice;
#error_log  logs/error.log  info;
#pid        logs/nginx.pid;

events {
     worker_connections 40960;
}

http {
    include       mime.types;
    default_type  application/octet-stream;
    #log_format  main  '$remote_addr - $remote_user [$time_local] "$request" '
    #                  '$status $body_bytes_sent "$http_referer" '
    #                  '"$http_user_agent" "$http_x_forwarded_for"';
    #access_log  logs/access.log  main;
    sendfile  on;
    #tcp_nopush     on;
    keepalive_timeout 65;

    #gzip  on;

    # another virtual host using mix of IP-, name-, and port-based configuration
    #server {
    #    listen       8000;
    #    listen       somename:8080;
    #    server_name  somename  alias  another.alias;
    #    location / {
    #        root   html;
    #        index  index.html index.htm;
    #    }
    #}

    map $time_iso8601 $logdate {
        '~^(?<ymd>\\d{4}-\\d{2}-\\d{2})' $ymd;
        default                       'date-not-found';
    }
	include vhosts/*.conf;

    # HTTPS server

    #server {
    #    listen       443 ssl;
    #    server_name  localhost;
    #    ssl_certificate      cert.pem;
    #    ssl_certificate_key  cert.key;
    #    ssl_session_cache    shared:SSL:1m;
    #    ssl_session_timeout  5m;
    #    ssl_ciphers  HIGH:!aNULL:!MD5;
    #    ssl_prefer_server_ciphers  on;
    #    location / {
    #        root   html;
    #        index  index.html index.htm;
    #    }
    #}

     client_max_body_size 50m;
     client_body_buffer_size 60k;
     client_body_timeout 60;
     client_header_buffer_size 64k;
     client_header_timeout 60;
     error_page 400 error/400.html;
     error_page 403 error/403.html;
     error_page 404 error/404.html;
     error_page 500 error/500.html;
     error_page 501 error/501.html;
     error_page 502 error/502.html;
     error_page 503 error/503.html;
     error_page 504 error/504.html;
     error_page 505 error/505.html;
     error_page 506 error/506.html;
     error_page 507 error/507.html;
     error_page 509 error/509.html;
     error_page 510 error/510.html;

     keepalive_requests 100;
     large_client_header_buffers 4 64k;
     reset_timedout_connection on;
     send_timeout 60;
     sendfile_max_chunk 512k;
     server_names_hash_bucket_size 256;
}
     worker_rlimit_nofile 100000;
创建用来运行的Nginx配置文件
mkdir /usr/local/nginx/conf/vhosts
vi /usr/local/nginx/conf/vhosts/def.conf
添加如下代码
server {
		listen	      80;
		#listen        80 proxy_protocol;
        server_name  localhost;
        root   "/usr/share/wwwroot";
        location / {
        try_files $uri $uri/ /index.php?$query_string;
            index index.php index.html error/index.html;
            #set_real_ip_from 193.110.203.248;
            #set_real_ip_from 127.0.0.1;
            #real_ip_header   proxy_protocol;
            #real_ip_recursive on;
            error_page 400 /400.html;
            error_page 403 /403.html;
            error_page 404 /404.html;
            error_page 500 /500.html;
            error_page 501 /501.html;
            error_page 502 /502.html;
            error_page 503 /503.html;
            error_page 504 /504.html;
            error_page 505 /505.html;
            error_page 506 /506.html;
            error_page 507 /507.html;
            error_page 509 /509.html;
            error_page 510 /510.html;
            autoindex  off;
        }
        location ~ \.php(.*)$ {
            #set_real_ip_from 193.110.203.248;
            #set_real_ip_from 127.0.0.1;
            #real_ip_header   proxy_protocol;
            #real_ip_recursive on;
            error_page 400 /400.html;
            error_page 403 /403.html;
            error_page 404 /404.html;
            error_page 500 /500.html;
            error_page 501 /501.html;
            error_page 502 /502.html;
            error_page 503 /503.html;
            error_page 504 /504.html;
            error_page 505 /505.html;
            error_page 506 /506.html;
            error_page 507 /507.html;
            error_page 509 /509.html;
            error_page 510 /510.html;
            fastcgi_pass   127.0.0.1:9000;
            fastcgi_index  index.php;
            fastcgi_split_path_info  ^((?U).+\.php)(/?.+)$;
            fastcgi_param  SCRIPT_FILENAME  $document_root$fastcgi_script_name;
            fastcgi_param  PATH_INFO  $fastcgi_path_info;
            fastcgi_param  PATH_TRANSLATED  $document_root$fastcgi_path_info;
            include        fastcgi_params;
        }
            #access_log /tmp/nginx/def.log;
}
注:PHP的配置文件基本不用修改 如有需要请自行修改
9.验证Nginx与PHP环境是否正常
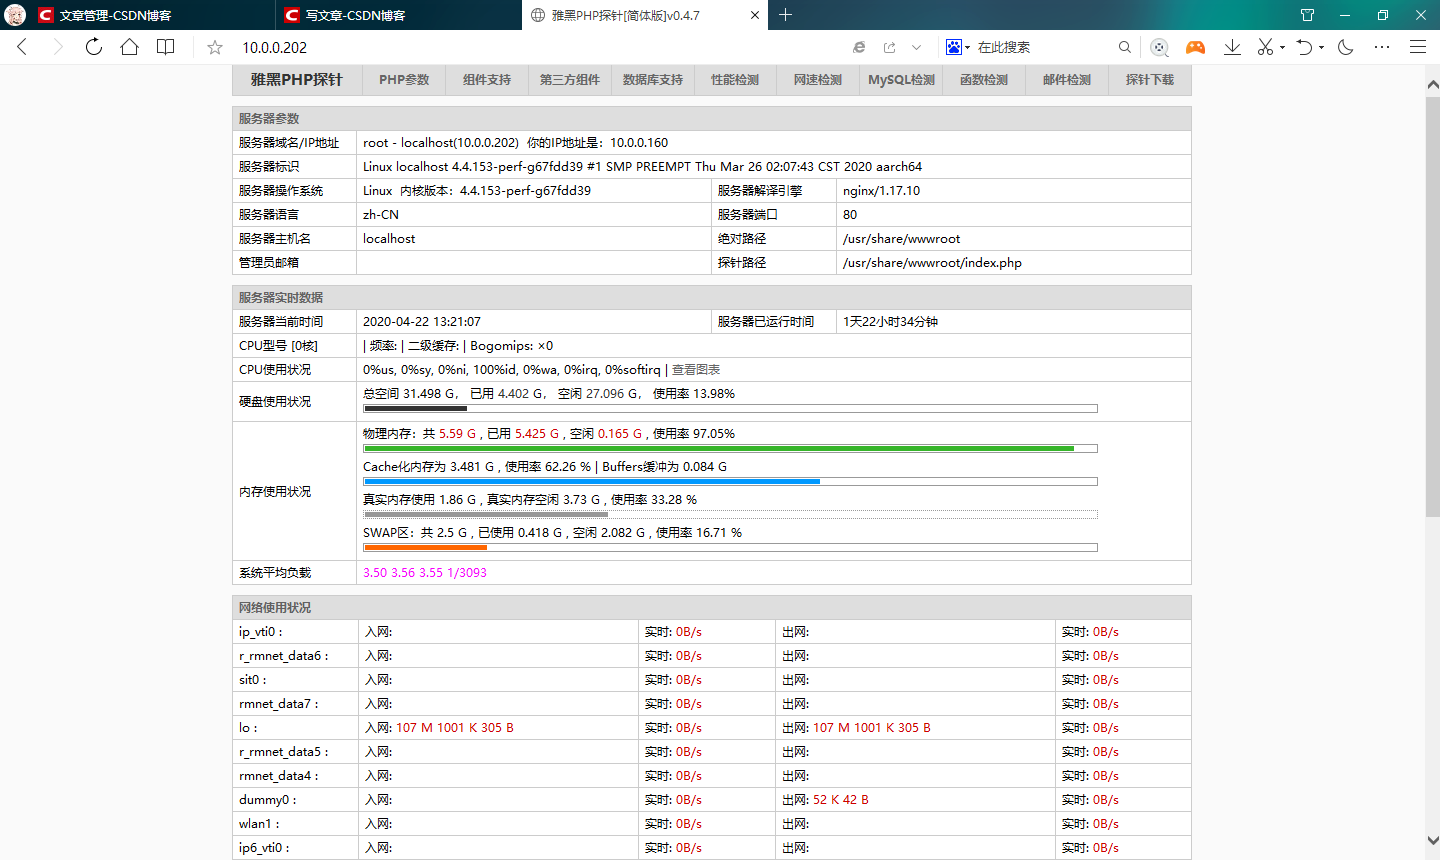
启动Nginx与php-fpm 然后扔一个PHP探针到网站目录
pureftpd &
nginx &
php-fpm &
cd /usr/share/wwwroot
wget http://www.yahei.net/tz/tz.zip
unzip tz.zip
mv tz.php index.php
netstat -an | grep 80 #检查80端口
netstat -an | grep 9000 #检查9000端口
netstat -an | grep 21 #检查21端口
浏览器打开设备IP:80 不出意外就OK啦
10.frp内网穿透,获取用户真实IP
frp内网穿透原理自行百度
编辑你的frp配置文件
添加一行代码启用 proxy_protocol
proxy_protocol_version = v2
你的frp配置文件就像这样
[something]
...
type = http
local_ip = 127.0.0.1
local_port = 80
proxy_protocol_version = v2
custom_domains = xxx.xxx
...
继续编辑Nginx配置文件
vi /usr/local/nginx/conf/vhosts/def.conf
设置listen为这样
listen 80 proxy_protocol;
取消如下注释 并设置set_real_ip_from为你的frp服务器IP
set_real_ip_from 193.110.203.248; #你的frp服务器IP
set_real_ip_from 127.0.0.1;		  #不用改
real_ip_header   proxy_protocol;
real_ip_recursive on;
注意看配置文件下面还有一段这样的注释也取消掉并设置为一样的内容
启动你的frp客户端,创建隧道,重载Nginx
./frpc_linux_arm64 -c frpc.ini #frpc_linux_arm64这个文件在哪里?去找你的frp服务商喽
nginx -s reload
温馨提示: 由于启用了 proxy_protocol_v2 协议只能使用域名访问 内网IP不行的哦
浏览器打开就看到你的真实IP地址了

后记
由于MIUI系统限制,屏幕熄灭会限制wlan活动 所以我个人不建议使用MIUI
从开始折腾到写完本文共耗时四天时间
感谢各路大佬们
本文所参考的部分文章:
https://blog.csdn.net/weixin_42930696/article/details/89327107
https://blog.csdn.net/smart9527_zc/article/details/84976097
https://xmyunwei.com/1794.html
https://blog.csdn.net/KimBing/article/details/81779768
https://blog.csdn.net/DurexAir/article/details/102498126
https://blog.csdn.net/weixin_33843409/article/details/93010639
https://www.cnblogs.com/ceyin/p/10695391.html
https://www.cnblogs.com/shihaiming/p/6281628.html
https://blog.csdn.net/u013310119/article/details/81031613
https://www.cnblogs.com/yunfan1024/p/11504039.html
https://blog.csdn.net/DurexAir/article/details/102498126
https://blog.csdn.net/wz392949231/article/details/86136450
https://blog.csdn.net/yelllowcong/article/details/76382900
http://blog.chinaunix.net/uid-2274226-id-5756596.html
https://blog.csdn.net/wyl_0728/article/details/76451466
https://www.cnblogs.com/guiyishanren/p/11098506.html
https://www.yangshujing.com/114.html
https://www.cnblogs.com/ryanlamp/p/8872376.html
https://blog.csdn.net/cs_ing/article/details/8728769
向各路大佬们致敬!!
Q.E.D.